![]()
Audience | Goals | Magnetism | Magnetic Fields | Magnetic Force | Stored Energy in Magnetic Fields | Magnetism & the Sun | Further Exploration | Bibliography
This activity is targeted towards high school students who have taken or are taking pre-calculus.Goals:
Through this activity, students will learn the basic principles of magnetism and how they apply to the Sun.Magnetism
Why study magnetism?Magnetic fieldsMagnetism is important in the study of the Sun, since it plays a key role in the dynamics of its surface. It is in part responsible for eruptions called coronal mass ejections that release high amounts of energy into space. If the radiation from these eruptions reach Earth, they can damage satellites, interrupt electronic communications, and even bring down electrical power grids. Like meteorologists who study thermodynamics in an attempt to predict the weather, solar physicists study magnetism on the Sun in hopes of understanding the "space weather" created by the Sun.What is magnetism?Magnetism is phenomenon that arises out of the movement of electric charge, a fundamental property of matter. It creates a magnetic force, a "push" or "pull", on objects with moving electric charge.Magnetism can also be demonstrated with a pair of magnets. Although currents, or a moving flow of electrons, are not present within them, magnets do in fact have moving electric charge at the atomic level. The electrons within the magnets are thought to spin in the same direction, resulting in a magnetic field. As a result of this self created field, each magnet has a polarity, or two poles, north and south. When a pole of a magnet is brought to the same pole of the other, the two magnets repel. When the poles are different, the magnets attract. As a pair of magnets can show, the movement of electric charge is the driving force of magnetism, which we will continue to study in further depth.
One way to describe magnetism is through magnetic fields. A magnetic field defines the magnetic force, the "push" or "pull," felt by a particle independent of its charge and velocity (the speed and direction of the particle) due to the presence of other moving charges. The stronger the field, the stronger the magnetic force felt by the particle. Likewise, the weaker the field, the weaker the magnetic force.Magnetic forceMagnetic fields can be visualized using magnetic field lines. These lines are curves where:
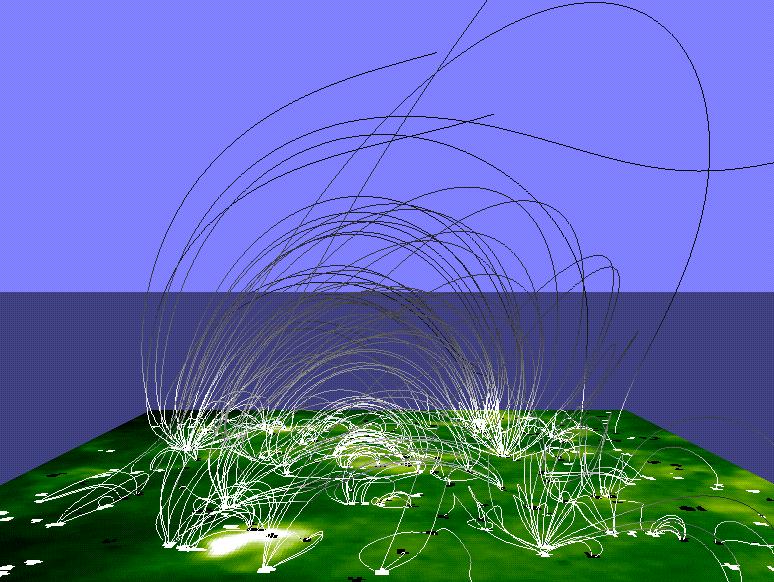
Magnetic field lines on the Sun
- At every given point the tangent (the line that intersects the curve only at the given point for an infinitesimal distance) is in the same direction as the magnetic field. If one were to place a compass in a magnetic field, the needle would point tangent to the magnetic field line.
- The magnetic field magnitude is proportional to the density of the lines. The closer together the field lines, the stronger the magnetic field. The more spread out they are, the weaker the magnetic field.
Observing magnetic fields experiment: The magnetic fields of a magnet can be indirectly observed using iron filings.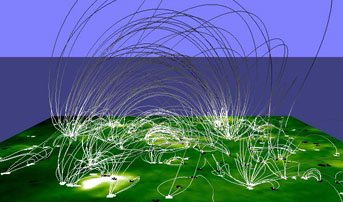
The image above is from a computer simulation of how the Sun's corona, or outer atmosphere, is heated by its "magnetic carpet." The loops that extend into the corona are magnetic field lines that join the north and south poles in the "magnetic carpet".Equipment:Procedure:bar magnetsAssembly:
a piece of cardboard much larger than a bar magnet
iron filings
a table
- Place a bar magnet on the table
- Place the cardboard on top of the magnet.
- Scatter the iron filings evenly over the cardboard.
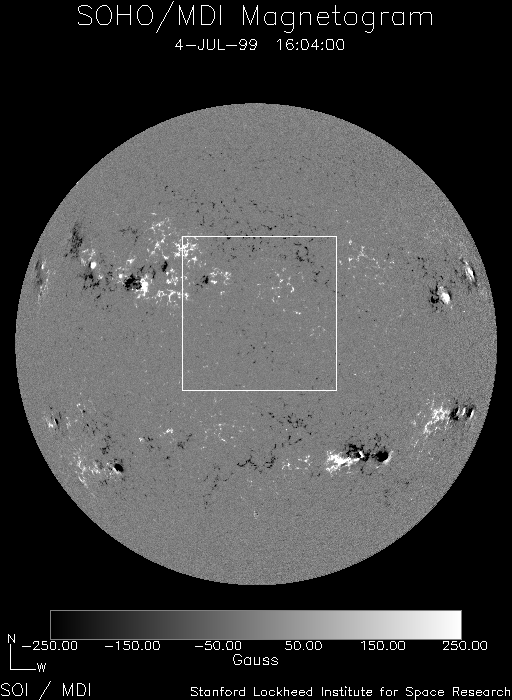
MagnetogramsWhat's Going On?
- Observe the iron filings. Are they pointed in any certain direction? Where do the filings concentrate, near regions of weaker or stronger magnetic field?
- Using the pattern formed by the iron filings as a guide, draw a magnetic field line diagram for the given magnet.
- In your magnetic field line diagram, make note of where the field lines are spread apart or concentrated. Using a pair of magnets, determine which parts of a magnet are stronger or weaker. Establish a relationship between the magnetic forces you felt using the pair of magnets and the concentration of field lines in your diagram.
The magnetic field created by the bar magnet induces a magnetic field in the iron filings. The iron filings become little magnets. Because the iron filings are rod-shaped, they have a tendency to form their poles in a lengthwise direction. As a result, they point in the same direction of applied magnetic field of the bar magnet, just as a compass needle would do when brought next to a magnet.Magnetic fields can also be visualized as magnetograms, which are used to make observations of the Sun. Magnetograms are visual representations of the polarity and the strength of magnetic fields that point directly away or towards the observer. Black regions have the strongest southward field (the field points away from the observer and into the Sun), and white regions have the strongest northward field (the field points towards the observer and away from the Sun). Gray areas have little or no magnetic field. One such instrument that generates magnetograms from its observations is the Michelson Doppler Imager (MDI) aboard the SOHO satellite. Daily magnetograms from this instrument are available.
Using the idea of fields that we explored in the previous section, the magnetic force exerted on a given particle can be expressed as follows in SI units:Stored energy in magnetic fieldsWhere q is the amount of charge, v the velocity of the particle, B the magnetic field, and q the angle formed between the velocity and magnetic field directions.Fmag = qvBsinq (1)If you are familiar with vectors and vector math, the magnetic force equation can be expressed in a more elegant form in SI units as:
In circuits, electrons, which have a negative charge, are moving through the wires. This flow of electrons, a unit charge per unit second, is called current. As a result of this current, magnetic fields are created around wires. Hans Christian Oersted (1777-1851) stumbled upon this phenomenon after a lecture that he had given. He observed that if a compass was placed parallel to a wire with flowing current, the compass needle would deflect. Perhaps the reason why magnetic force was not detected in wires until Oersted is because of the large amount of current needed to create a measurable magnetic force. The relative weakness of magnetic force, compared to electric force that arises out of the presence of electric charge, can be seen in the next experiment with a wire coil and magnet.Fmag = qv x BForce between a wire coil and magnet: The fact that moving charges create magnetic force can be seen in a wire coil with current flowing through it and a magnet.
Equipment:Applying this idea to the Sun, we see that magnetic fields and force arise out of the movement of charges through its highly conductive plasma, just as magnetic fields and force arose out of the movement of current through the coil.Thick magnet wire for the coil (around #20 gauge)Assembly:
Thin magnet wire that is light and flexible (around #36 gauge)
A Magnet
Power supply
Stands (to hold the coil)
Thread (to suspend the coil from the stand)
Wires with alligator clips
Graph paper
A flat surface such as a textbook (should be able to hold the graph paper vertical)Procedure:
- Wrap the thick magnet wire around a cylindrical object such as a pen and count the number of turns made. Make thirty to forty turns. Be sure that the wire is wrapped evenly. Record the number of turns.
- Trim the ends of the wire so that they are about the same length. Burn off the enamel on the ends by passing them through a lighted match. Another way to remove the enamel is by scrapping it off using a pair of scissors or pliers.
- Carefully remove the coil from the cylindrical object so that its shape is preserved.
- Tie one end of the string around the middle of the coil so that when suspended, it hangs horizontally. Tie the other end to the stand, suspending the coil.
- Remove the enamel on the ends of two thin magnet wires in the same way that enamel was removed for the thick wire. Connect an end of a thin wire to one end of the coil. Do the same to the other coil end with the other thin wire. This allows the coil swing easily without being restricted by heavy wires.
- Connect a wire with alligator clips to one thin wire. Do the same with the other thin wire. Make sure that the thin wire is long enough, so that the metal of the alligator clips does not interfere with the magnet when it is brought up to the coil.
- Connect the other ends of the wires with alligator clips to the power supply, forming a circuit.
- Tape the graph paper to the flat surface and stand the surface up behind the coil. With a pencil, place a mark on the graph paper directly behind the right side of the coil. This allows us to measure the distance the coil has moved when a magnet is placed next to it.
What's Going On?
- Turn on the power supply. Turn the current up to one ampere or the highest setting if one ampere cannot be reached. A current will flow through the coil, resulting in a magnetic field.
- Bring a magnet close to the right end of the coil. Does the coil repel or attract?
- Orient the magnet so that the coil is attracted to the magnet. Being careful to see that the thin wires are not pulling the coil, pull the coil to the right from its initial position using the magnet. Place a mark on the graph paper at the location of the right side of coil where the coil falls away. Also write the amount of current being provided by the power supply next the mark.
- Decrease the amount of current provided by the power supply. Repeat steps two and three. Continue decreasing the current until a satisfactory number of measurements are made.
- If you have extra magnet wire, make another coil, this time with a fewer number of turns and conduct the same experiment (steps one through four) as before.
According to Equation 1, Fmag = qvBsinq, magnetic force arises out of the movement of electrons in the coil (the qv part) and the application of a magnetic field supplied by the magnet (the B part). The movement of charge through the coil, which also gives rise to the coil's own magnetic field, and the magnetic field of the magnet is why a force is felt between the two object. As for the need to coil the wire, coiling allows more charge to flow through the wire in a smaller volume, thus increasing magnetic force. If we were to use a straight wire, a magnetic force would still be present, but it would be so slight that it could not be observed easily. The coil falls away at a certain point because gravity is pulling down on it, and the magnetic force between the coil and magnet is great enough to overcome the opposing gravitational force.Calculations:Using the data obtained from the experiment, show that the magnetic force is directly proportional to the amount of current provided (which is related to qv in Equation 1). Also, if more than one coil was made, establish a relationship between the number of coils and the strength of the magnetic force.
The final aspect of magnetism that is necessary to have a basic understanding of the dynamics on the surface of the Sun is the idea that magnetic fields can store energy. The energy stored in a magnetic field is essentially the total amount of work required to assemble a system of moving charges. Stored energy in magnetic fields can be illustrated in the following experiment with a pair of magnets.Magnetism on the SunMagnet Acrobatics:
Equipment:Two magnetsProcedure:What's Going On?
- Place a magnet on the table and hold it in place with one hand.
- Orient the other magnet above the one on the table such that each pole faces the same pole on the other magnet.
- Bring the top magnet down onto the other one on the table. The magnets should repel each other as you do this. Hold the stacked magnets together.
- Let go of the magnets, being sure to move your hands out of the way. The magnets will perform their acrobatics.
When the two magnets are brought together, a force must be exerted for a given distance, i.e. work is being done to bring these two magnets together. Energy in the form of moving magnets is released when the one lets go of them. This release of energy causes them to jump.
Combining our understanding of the basic features of magnetism, specifically magnetic fields, magnetic force, and the storage of energy in magnetic fields, we can now focus on magnetism particular to the Sun.Coronal mass ejectionsMagnetic reconnection
One important aspect of magnetism on the Sun is magnetic reconnection, which can be better understood if we first examine what plasma is. Plasma is a state of matter occurring at high temperatures where electrons are not bound to the nucleus. As a result, ions and electrons are free to move about the material. The free movement of charges makes plasma highly conductive, thereby causing magnetic field lines to be "frozen" into the plasma.SunspotsIn reconnection, fluid motions in plasma bring together two "frozen" and oppositely directed magnetic field lines. These field lines then reconnect into a lower energy state. As we found out in the Magnet Acrobatics activity, magnetic fields can store energy. Energy is stored in reconnection when the "frozen" field lines become distorted as a result of fluid motion. Reconnection reduces the amount of distortion, which in turn causes energy to be released. This can be illustrated in the following activity with rubber bands.
Reconnecting Rubber Bands - Since magnetic reconnection occurs in plasmas, which cannot be feasibly produced in a high school lab, we will have to be content with an activity using rubber bands to model magnetic reconnection. This activity requires two people.
Equipment:Magnetic reconnection is important to solar physicists since they think that it in part is the cause of flares and coronal mass ejections (CMEs). It is also thought to be a possible heat source for the corona, which is unexpectedly hotter than the surface layers below it.A flat rubber bandProcedure:
Two binder clips
A marker
A pair of scissors
- Have your partner stretch out the rubber band into a rectangle using the index finger and thumb of both hands as corners.
- Use a marker to draw four arrows on each side of the rubber band rectangle. The arrows should point in the direction of a closed path traced along the rubber band. The rubber band now represents magnetic field lines.
- Choose two opposing sides of the rectangle and pinch them together. This is simulating the distortion of magnetic fields that occurs before reconnection.
- Hold the two opposing sides together with both binder clips.
- Take a pair of scissors and cut the two "magnetic field lines" between the binder clips. This is simulating reconnection of the field lines.
- Note that energy from the rubber bands is released, which also happens during magnetic reconnection.
Magnetism is also responsible for the formation of sunspots. ö`` Sunspots are small areas on the Sun that appear dark because of their relative low temperature. This low temperature is thought to be caused by magnetic fields. The magnetic field inhibits convection, or the distribution of heat, resulting in a cool sunspot (Tayler 29).
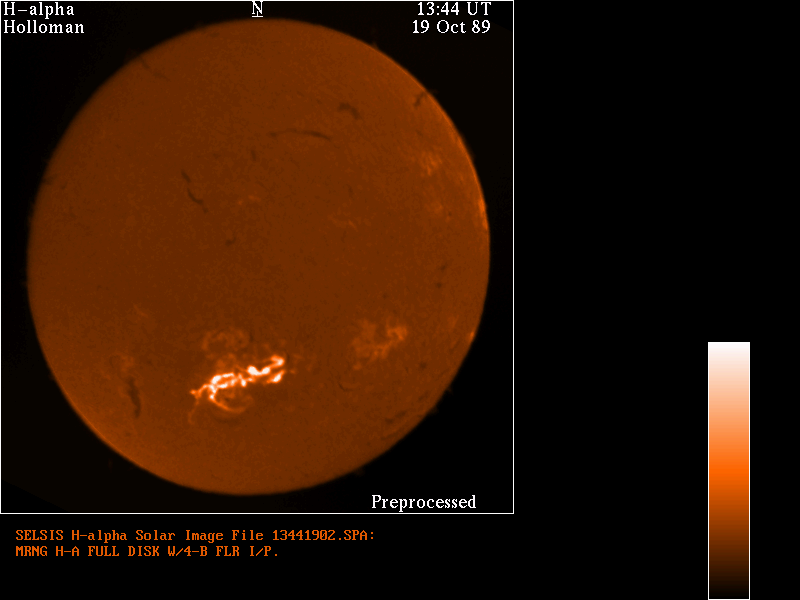
Flares are eruptions of particles and radiation on the surface of the Sun. They are the result of a buildup in activity around sunspots. Lasting up to an hour, they release massive amounts of energy equivalent to a billion megatons of dynamite (Hathaway par.1). The energy that they release is thought to be from magnetic reconnnection.
Prominences are arch-like structures in the corona and are seen at the limb of the Sun. They are called filaments when they are projected onto the disk of the Sun. These structures are supported by long lasting magnetic field formations in quiescent prominences. Active prominences occur over sunspots, whereas quiescent prominences appear where there are no sunspots or with decaying sunspot groups.

The flare "myth"One of the most significant consequences of magnetism is the coronal mass ejection (CME), a large scale and sudden expulsion of magnetized plasma from the Sun's corona, or outer atmosphere (Wagner 267). CMEs are so large that they can occupy as much as a quarter of the solar limb. Despite their size, CMEs were not discovered until the 1970s, in part because the Earth's atmosphere prevented instruments from detecting their presence and the erroneous attribution of geomagnetic storms primarily to solar flares. CMEs can send so many charged particles at high speeds to the Earth that they penetrate the magnetosphere, a cavity created by the Earth's own magnetic field that deflects particles from the solar wind. These geomagnetic storms caused by CMEs can disrupt communications & navigation systems, satellites and power grids. Like flares, CMEs derive their energy from magnetic fields. The twisting and distortion of magnetic field lines stores energy in the field which is later released when a CME forms.

Before modern observations proved otherwise, the majority of scientists believed that the geomagnetic storms experienced on Earth were a result of solar flares. As a result, they based their theories on a strong causal relationship between flares and geomagnetic stores. However, starting with the discovery of coronal mass eruptions (which are called coronal mass ejections today) in the spacecraft observations of OSO-7 and Skylab, it is clear that this relationship is wrong. (Kahler 114, Gosling par.3). Coronal mass ejections rather than flares are the causes of energy release and geomagnetic storms. Unlike what was also previously thought, flares are not even required for coronal mass ejections to take place.
 Return
to home page
Return
to home page


